


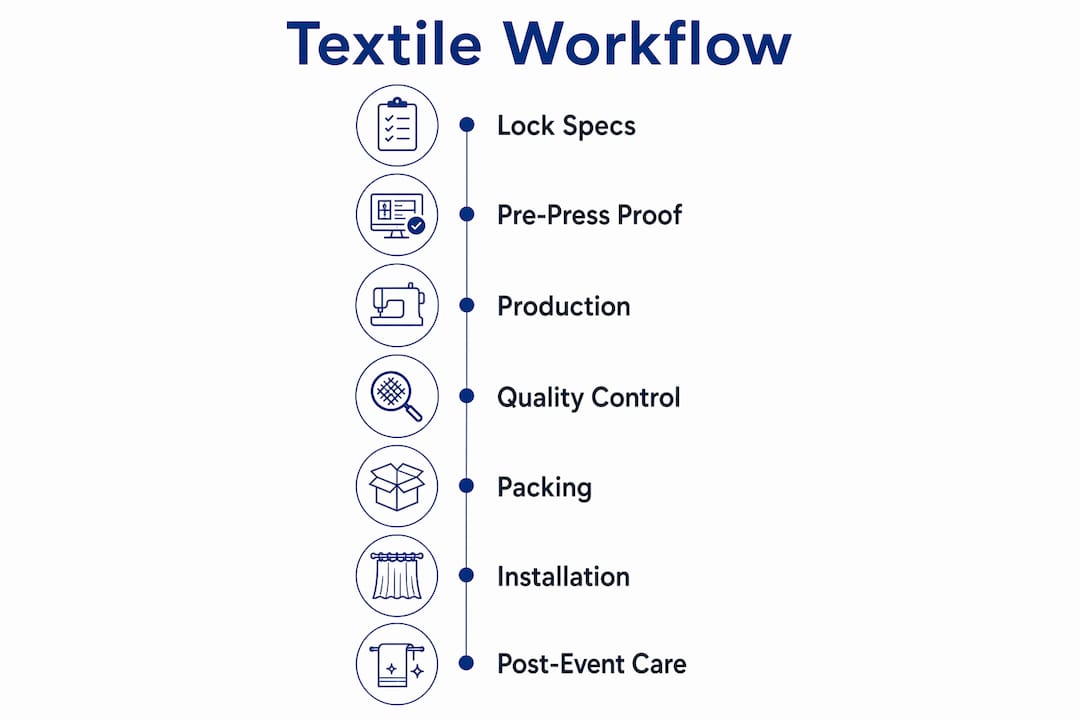
A reliable event decoration textile workflow follows seven stages: planning and specs, design and pre-press, production, QC and inspection, packing and logistics, onsite installation, and post-event handling. Executed in sequence, with signed approvals at each handoff, this process eliminates last-minute reprints, controls drayage costs, and keeps installs on schedule. Tools like ONYX Textile handle pre-press automation; operators like Gjergjihtextil bring 30+ years of hospitality-scale production discipline to each stage.
The seven workflow stages at a glance:
- Stage 1: Planning and specs — lock material, finish, and dimensional requirements
- Stage 2: Design and pre-press — file prep, bleeds, finishing marks, color profiles
- Stage 3: Production — printing, finishing, and in-house vs. outsourced decisions
- Stage 4: QC and inspection — incoming, in-process, pre-shipment, and post-install checks
- Stage 5: Packing and logistics — label, stage, and load in install order
- Stage 6: Onsite installation — sequenced crew deployment and contingency protocols
- Stage 7: Post-event handling — laundry, repair logging, restock, and reuse decisions
Table of Contents
- What does an end-to-end textile workflow map look like?
- How do you lock specs and approvals before production starts?
- What pre-press rules prevent costly reprints and fitting problems?
- Should you bring textile production in-house or outsource it?
- How do you set quality-control gates that stop defects before they ship?
- How do you pack and stage textiles to avoid dock bottlenecks?
- What does an effective onsite installation sequence look like?
- How do you protect textile assets after the event ends?
- Which tools and templates should you implement first?
- What KPIs should you track to reduce rework over time?
- How does Gjergjihtextil apply this workflow at hospitality scale?
- Key Takeaways
- What experienced operators know that most guides skip
- Gjergjihtextil supports your workflow from spec to post-event restock
- Useful sources and where to find templates
What does an end-to-end textile workflow map look like?
Each stage has a single owner and a clear handoff condition. Nothing moves forward without a sign-off.
| Stage | Owner | Handoff Condition |
|---|---|---|
| Planning and specs | Operations manager | Approved spec sheet and budget |
| Design and pre-press | Design lead | Client-approved proof and color swatch |
| Production | Production manager | Pre-press sign-off complete |
| QC and inspection | QC lead | Acceptance criteria met, defect log closed |
| Packing and logistics | Logistics coordinator | QC pass, load plan approved |
| Onsite installation | Lead installer | Dock window confirmed, crew briefed |
| Post-event handling | Warehouse supervisor | Damage log completed, inventory updated |
Critical-path milestones for hospitality-scale jobs:
- Client spec approval: well in advance of the event date
- Design proof approval: several weeks before the event
- Production start: a few weeks prior to the event
- Pre-shipment QC: about ten days before the event
- Dock arrival and staging: a few days before the install window
Pro Tip: Treat physical movement with the same discipline as digital planning. Assign dock windows, log every handoff, and validate load plans against the venue’s unload sequence before a single truck is dispatched.
How do you lock specs and approvals before production starts?

The spec sheet is the contract between your team and the production floor. Missing a field costs time and money.
Spec sheet required fields:
- Material type, weave, and weight
- Finish type: blockout, sheer, or semi-transparent
- Color standard: PMS/Pantone reference or physical lab swatch
- Dimensional tolerances (width, height, hem allowance)
- Finishing method: SEG, pole pocket, grommet, or hemmed edge
- Fire-resistance certification requirement (NFPA 701 or venue-specific code)
Approval calendar example:
| Milestone | Internal Deadline | Client Deadline | Buffer |
|---|---|---|---|
| Spec sheet draft | Week 1 | Week 2 | 5 days |
| Sample swatch approval | Week 3 | Week 4 | 3 days |
| Design proof sign-off | Week 5 | Week 6 | 4 days |
| Production release | Week 7 | — | — |
Budget drivers to flag at spec stage: material grade, finishing complexity, drayage distance, and estimated repair allowance. A hotel textile supply chain that controls sourcing from import through distribution can compress both lead times and per-unit cost.
Pro Tip: Build a 3-day contingency buffer into every client approval deadline. Late sign-offs are the single most common cause of rush production fees.
What pre-press rules prevent costly reprints and fitting problems?
Pre-press review is the primary insurance policy against event delays. A missed bleed or wrong color profile discovered on-site cannot be fixed in time.
File-prep checklist:
- Vector logos at final output size; rasterized logos minimum 100–150 DPI at final scale
- Embedded ICC color profiles matched to the output device
- Bleeds: as required for SEG frames and pole pockets
- Sewing and hemming marks added in RIP software (ONYX Textile adds these automatically)
- Safe zones verified for tensioned frames: branding must sit inside the safe zone, not in the bleed area
Fabric has physical give that rigid media does not. For silicone edge graphics (SEG), the safe zone must account for the fabric being pulled into the channel — with an inset from the finished edge suitable to maintain visual integrity. For pole pockets, calculate the pocket depth and add it to the top and bottom bleed. Ignoring these tolerances means logos and text shift out of frame under tension, and no amount of post-install adjustment fixes a misregistered print.
Dye-sublimation bonds color into fibers for deeper saturation and better resistance to folding, making it the preferred method for photography-critical installs. For short-term indoor use, direct printing is an acceptable alternative.
Pro Tip: Run a physical color swatch print before releasing the full job. Screen proofs do not replicate how dye interacts with specific fabric weights.
Should you bring textile production in-house or outsource it?
The answer depends on turnaround requirements, volume consistency, and color-control standards.
- Assess turnaround needs first. In-house production can compress lead times from days to hours and allows same-day print changes during build phases. Outsourced models cannot match that flexibility.
- Evaluate volume consistency. In-house investment pays off when you run recurring, high-volume event programs. Sporadic single-event work often costs less to outsource.
- Consider color control. When textiles must match printed collateral, signage, and uniforms exactly, in-house production eliminates the color-shift risk that comes with third-party print queues.
- Calculate capital and staffing. Dual-head sublimation systems support continuous output and rapid material switching, but require trained operators and scheduled maintenance.
Production best practices:
- Schedule preventive maintenance outside peak production windows
- Use roll-to-roll systems for large backdrops; flatbed for rigid-backed textile panels
- Activate step-and-repeat features in RIP software to reduce operator setup time and material waste
- Run automated color-swatch checks at the start of each production batch
Pro Tip: If you outsource, require a pre-production proof on the actual substrate before the full run starts. Approving a screen proof for a fabric job is not sufficient.
How do you set quality-control gates that stop defects before they ship?
Four inspection checkpoints cover the full production cycle.
Inspection checklist by stage:
- Incoming materials: verify weight, weave, and color against spec sheet; reject non-conforming rolls before printing
- In-process: check color consistency every 10 linear meters; inspect seam alignment and stitch density
- Pre-shipment: full print review against approved proof; measure finished dimensions; verify finishing (grommets, hems, pole pockets)
- Post-install: photograph each panel in place; document any tension or color issues before client sign-off
Acceptance criteria:
| Criterion | Tolerance |
|---|---|
| Color variance (Delta E) | ≤ 3 |
| Stitch density | ≥ 7 stitches/in. |
| Seam strength | No separation under standard tension |
| Surface defects | Zero visible defects at 3 ft. viewing distance |
When a defect is found, log the job ID, defect type, root cause, corrective action, and responsible party. Feed that data into monthly supplier scorecards to drive upstream quality improvement.
How do you pack and stage textiles to avoid dock bottlenecks?
Pack in install order, not inventory order. That single rule prevents the most common cause of delayed load-ins.
Packing label required fields:
- Job name and event date
- Panel ID and install sequence number
- Room or zone assignment
- Fragile or special handling notes
- Cleaning and care instructions
A 20-foot fabric backdrop folds into a small bag, which lowers drayage fees significantly compared with rigid media. Use that advantage by packing textiles last-in/first-out relative to the install sequence.
| Truck Zone | Contents | Install Order |
|---|---|---|
| Zone A (rear) | Stage backdrops, main hall panels | Install first |
| Zone B (mid) | Table runners, chair covers | Install second |
| Zone C (front) | Accent pieces, repair kit | Install last / contingency |
Pro Tip: Use barcode scanning at pack and at dock receipt. A logistics platform that treats trucks, docks, and gear as a single coordinated system eliminates dock-window collisions and prevents repacking under time pressure.
What does an effective onsite installation sequence look like?
A timed install checklist keeps crews from working over each other and gives you a clear sign-off record.
Install checklist with timing targets:
- T-minus 4 hrs: staging area confirmed, all panels scanned and accounted for
- T-minus 3 hrs: frame assembly complete, mounting hardware verified
- T-minus 2 hrs: graphic panels tensioned and seated; SEG channels checked
- T-minus 1 hr: lighting check against installed textiles; color and tension verified
- T-minus 30 min: final clean, photography sign-off, client walkthrough
Crew role table:
| Role | Responsibility | Crew per Module |
|---|---|---|
| Lead installer | Frame assembly, panel sequencing | 1 per zone |
| Rigger | Overhead and ceiling installations | 1 per overhead element |
| QC inspector | Tension check, color match, defect log | 1 per floor |
| Logistics lead | Dock coordination, scan reconciliation | 1 per truck |
Contingency protocols:
- Late shipment: activate pre-positioned spare panels from Zone C; notify client immediately
- Damaged panel on-site: photograph, log, and substitute from spare inventory; initiate reprint if time allows
- Color mismatch discovered at install: document Delta E reading, escalate to QC lead, and determine whether the variance is within client-acceptable tolerance before proceeding
Pro Tip: Brief the full crew on the install sequence before the first panel is touched. A five-minute pre-install meeting prevents two hours of rework.
How do you protect textile assets after the event ends?
Post-event handling determines whether your textiles are reusable assets or single-use waste.
Post-event flow:
- Collect and scan all panels against the pack list
- Inspect for damage: staining, tears, color fade, grommet failure
- Launder or dry-clean per fabric care spec; target turnaround within 48 hours of collection
- Repair damaged items; log repair cost and expected turnaround
- Restock to inventory with updated condition status
- Update digital inventory record with reuse or retire decision
Repair tracking fields:
| Field | Description |
|---|---|
| Job ID | Source event identifier |
| Damage type | Stain, tear, color fade, hardware failure |
| Repair action | Launder, re-hem, reprint, retire |
| Repair cost | Actual cost in USD |
| Expected turnaround | Days to return to stock |
Choosing washable, durable textiles from the start lowers lifecycle cost and supports compliance with evolving sustainability regulations. Gjergjihtextil’s sustainable textile practices guide covers material selection criteria that extend reuse cycles and reduce waste.
Pro Tip: Set a reuse threshold: retire any panel that has required two or more repairs or shows visible color fade at 3 ft. Keeping degraded textiles in rotation damages your visual standards faster than the cost of replacement.
Which tools and templates should you implement first?
Start with the tools that address the highest-risk failure points: pre-press errors and packing sequence mistakes.
Tool classes by function:
- RIP and pre-press: ONYX Textile (step-and-repeat, sewing/hemming marks, color swatch books, job preview)
- WMS and inventory: warehouse management systems with barcode scan-in/scan-out and condition tracking
- Label and barcode: thermal label printers with job-specific templates tied to your pack list
- Logistics and load planning: platforms that coordinate dock windows, truck capacity, and install sequence
Implementation priority:
- Week 1 (quick wins): deploy packing labels with install-order sequencing; require pre-press proofing sign-off on every job
- Month 1 (medium term): implement barcode scanning at pack and dock receipt; standardize the spec sheet template across all jobs
- Quarter 1 (longer term): evaluate in-house print capability against volume thresholds; integrate WMS with your logistics platform
The Gjergjihtextil event textile solutions checklist provides a ready-to-use template set covering spec sheets, pre-press checklists, and packing labels.
What KPIs should you track to reduce rework over time?
Five metrics cover the full workflow and surface problems before they become patterns.
KPI definitions:
- On-time delivery rate: percentage of jobs delivered to dock within the confirmed window
- First-pass acceptance rate: percentage of panels passing QC without rework on the first inspection
- Reprint rate: number of panels reprinted as a percentage of total panels produced
- Average repair cost per job: total repair spend divided by number of jobs in the period
- Drayage cost per job: total freight and handling cost divided by number of events
| KPI | Target | Review Cadence | Owner |
|---|---|---|---|
| On-time delivery rate | ≥ 90% | Monthly | Logistics coordinator |
| First-pass acceptance rate | ≥ 90% | Monthly | QC lead |
| Reprint rate | ≤ 3% | Monthly | Production manager |
| Average repair cost | Trending down | Quarterly | Warehouse supervisor |
| Drayage cost per job | Trending down | Quarterly | Operations manager |
Feed inspection defect logs into monthly reviews. When a defect type recurs across two or more jobs, open a corrective action with the responsible supplier or internal process owner. That feedback loop is what converts raw inspection data into measurable quality improvement.
Pro Tip: Build your KPI dashboard in a shared spreadsheet before investing in dedicated software. The discipline of filling it in weekly matters more than the platform you use.
How does Gjergjihtextil apply this workflow at hospitality scale?
Gjergjihtextil has supplied event and decoration textiles to major international hotel brands including Meliá, Marriott, and Sheraton. That client portfolio is not a marketing claim; it is evidence that the workflow described above operates reliably under the quality standards those brands enforce.
Workflow application in practice:
- Spec sheets are locked with the client before any design work begins, preventing scope changes that drive reprint costs
- Pre-press proofing, including physical color swatches, is mandatory on every job regardless of repeat-order status
- Packing is sequenced by install order, with barcode labels on every panel, so hotel crews can unload and install without repacking
- Post-event textiles are inspected, laundered, and logged within 48 hours, maintaining a reusable inventory that lowers per-event cost over time
With 30+ years of hospitality textile operations, Gjergjihtextil has built its workflow around one principle: every defect caught before shipment costs only a fraction of what it costs to fix on-site. Pre-press discipline, QC gates, and install-order packing are not optional steps — they are the operational foundation that keeps large-scale hotel and venue programs running without disruption.
The textile printing and fabric manufacturing capabilities Gjergjihtextil maintains in-house give clients the same speed and color-control advantages that in-house production delivers, without the capital investment.
Key Takeaways
A structured event decoration textile workflow, from locked specs through post-event repair logging, is the most reliable way to reduce reprints, control drayage costs, and protect textile asset value across hotel and venue programs.
| Point | Details |
|---|---|
| Lock specs before design | A complete spec sheet with PMS references and finish type prevents scope changes that drive reprint costs. |
| Pre-press proofing is non-negotiable | Verifying bleeds, safe zones, and color profiles before production eliminates the most common cause of on-site failures. |
| Pack in install order | Sequencing packing by install order, not inventory category, prevents repacking at the dock and speeds load-in. |
| Track five core KPIs | On-time delivery, first-pass acceptance, reprint rate, repair cost, and drayage cost per job surface problems before they become patterns. |
| Gjergjihtextil as workflow partner | With 30+ years supplying Meliá, Marriott, and Sheraton, Gjergjihtextil applies this full workflow from spec to post-event restock. |
What experienced operators know that most guides skip
The conventional wisdom on event textile workflows focuses on the visible stages: design, print, install. The real operational risk lives in the handoffs, specifically the approval handoff between client and production, and the packing handoff between the warehouse and the truck.
Late client sign-off is the most common workflow failure, and it is almost always preventable. Build the approval calendar with the client at the start of the engagement, not after the spec sheet is drafted. When clients see their own name next to a deadline, compliance improves. When they do not, every delay becomes the vendor’s problem.
Improper pack sequencing is the second most costly mistake, and it happens because teams pack by what is ready, not by what installs first. That habit makes sense in a warehouse context and creates chaos at a venue dock. The fix is simple: the pack list is built from the install plan, not from the production completion order.
Fabric safe zones are the most technically misunderstood element. Many operations teams treat the bleed as the safe zone. They are not the same. The safe zone sits inside the finished edge; the bleed extends beyond it. Confusing the two means branding disappears under tension every time.
A staged rollout of process changes works better than switching everything at once. Start with packing labels and pre-press sign-off in week one. Add barcode scanning in month one. Evaluate WMS integration after you have three months of clean data. Each stage builds on the last, and your team develops the discipline before the complexity increases.
Gjergjihtextil supports your workflow from spec to post-event restock
For hospitality operations teams managing high-volume event textile programs, Gjergjihtextil offers a concrete alternative to coordinating multiple vendors across production, finishing, and logistics. With wholesale sourcing from Italy, China, India, and Pakistan, in-house printing and finishing, and a supply chain built specifically for hotels and venues, Gjergjihtextil delivers production-ready textiles that arrive labeled, sequenced, and ready to install.

The practical difference: clients receive spec-sheet templates, pre-press proofing support, and packing lists built to their install sequence, not generic vendor documentation. That operational support is what keeps programs for brands like Marriott and Sheraton running without rework or delays.
Visit the hotel textile procurement page to request a quote or consultation, or download the event textile solutions checklist to start implementing the workflow immediately.
Useful sources and where to find templates
Research and reference sources used in this guide:
- ONYX Textile (Canon) — pre-press workflow features including step-and-repeat, sewing/hemming marks, and color swatch books: canon.co.uk
- Image Square Printing: Custom Fabric Printing for Events — pre-press rules, color management, dye-sublimation guidance, and drayage cost advantages of fabric vs. rigid media: imagesquareprinting.com
- TEXINTEL: Event Engineering and Sinocolor — in-house production speed and same-day change capability: texintel.com
- ShowOps.AI Logistics — dock management, load-plan optimization, and install-order packing discipline: showops.ai
- Hanzer: Sublimation Printing — dual-head sublimation systems and continuous production throughput: hanzer.vip
Templates and next steps:
- Event textile solutions checklist — spec sheet, pre-press checklist, and packing label templates
- Hotel textile selection tips — material selection guidance for planning and lifecycle cost decisions
- Hospitality workflow efficiency guide — operational workflow context for dock sequencing and on-site coordination